
Tags

A year ago I would have never imagined that I would care about or want to know how to ferment vegetables. Times have changed in this household for sure. Why ferment veggies? From what I’ve read, fermenting foods like our ancestors used to do, provides the best form of probiotics and the easiest for our bodies to absorb. After reading this information many times over, I knew I had to figure out how to do it. We are, after all, working hard to heal our guts and improve our immunity/overall health.
After tons of time spent perusing various methods on the interwebs, and after several failed attempts, I’ve found what works best for us. The kids love it and they remember to get it out when I’ve forgotten; we have scoops of it pretty much every day. Even if they take a mere bite, I am happy. This jar of fermented veggies is Noah’s “go-to” when he has a sour stomach or stomach ache of any kind. It, along with bone broth, has brought my stomach issues to a much better and livable place.
So, here we go…this, by the way, is how to “wild ferment.” This is much more of a method than a recipe.
Fermented Vegetables
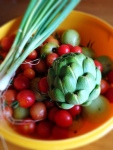
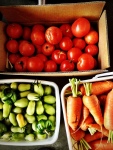
1 head of cabbage (Napa and regular work great), cored and cut into large wedges or chunks (reserve 2 large outer cabbage leaves before cutting*)
1-2 cucumbers
1 daikon radish
2 small or medium carrots, or 1 large
1 red pepper
2-inch segment of fresh ginger
2-3 T. Celtic, Himalayan, or sea salt (the kind with the most minerals and nutritious value)
Process the cabbage in your food processor until shredded. You want it to have a nice shred but not be completely processed to tiny bits. Add the cabbage to a large bowl. Press down the cabbage with a potato masher for at least 5 minutes. Water/cabbage juice will begin to appear in the bowl – that is what we want. Sprinkle the cabbage with 1-2 T. of salt.
Process the remaining vegetables in your food processor and add to the bowl of cabbage. Again, we’re looking for them to be shredded but not decimated. I just pulsed carefully until it was where I wanted it to be. My food processor has a julienne blade which worked great for processing the remaining veggies. You can also chop everything finely with a knife. The more surface area of the vegetable that is exposed, the better the fermentation will occur. As you add veggies to the bowl, continue to intermittently give the mixture a good squashing with the potato masher. Once all veggies have been chopped, sprinkle the remaining tablespoon of salt on top and mash for another minute or two. You can stir the mixture together as you mash.
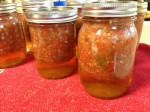
Once everything has been combined, place the mixture in a large, sterile glass jar, keeping the vegetables below the liquid as much as possible. As you add the vegetables you can pack them into the jar slightly – use the potato masher for this too! Top the vegetables with the large, loose cabbage leaves. This will keep the mixture from being exposed to any air in the jar – the best and safest fermentation occurs when the mixture remains in the liquid. Sometimes I place a small cup on top of the cabbage leaves and under the lid to add pressure and keep the mixture below the liquid. Make sure there is extra room left at the top of the jar because as the veggies sit, they will produce more and more liquid. I’ve had a few overflows…seems like I’m always surprised at how much liquid comes out of the vegetables.
Store the jar (or jars, if you’ve used smaller jars instead of one big one*) on your counter or in your pantry for 3 to 7 days. The longer it sits out, the more it will ferment. Watch for any browning at the top – remove any vegetables that may have browned due to not being under liquid. I’ve never had to do this, but have read that it can happen. You will know the fermentation process has begun when you see the liquid slightly bubbling on the sides of the jar. Open the jar and let some air/gas out for a second or two each day. Taste it from day to day and when it has the flavor you like, put it in the refrigerator. It will continue to ferment in the fridge but at a much slower rate. We’ve eaten almost all of our current batch (as shown above) and it tastes way better now than it even did at the beginning. It will last in the refrigerator for at least 2 months.
Feel free to use whatever vegetables you like. Organic would be the very best. I honestly can’t remember if I found organic daikon radish or not. I’m guessing I was just thrilled to find it at all up here in our little mountain town. Just make sure you have cabbage at the very least, and also cucumber. Both are key in beginning the fermentation process. Daikon radish performs the same job as the cabbage and cucumber. Garlic is a nice addition also, but the flavor definitely becomes stronger and stronger as it ferments.
If there is any remaining liquid leftover once you’ve finished eating all of the fermented vegetables, you can pour the liquid into the next batch you make. There are a lot of amazing probiotics left in that liquid!
I should note that even though I am the daughter of a German, I spent the better part of my life hating, and I do mean HATING sauerkraut. Needless to say, I was quite nervous about giving what basically is “enhanced sauerkraut” a go. I think the big difference for me is that this is raw and I’ve been raised on cooked or roasted (gag times infinity) sauerkraut. I’m not a good “krauthead” as my German grandmother would say. So, if you’ve disliked sauerkraut before, this is very different and much more delicious. Seriously.
Ok, I’m done pushing. For now. 🙂
*If you’ve used several smaller jars, make sure you reserve additional cabbage leaves so you have enough to place at the top of each jar.


 This is just under 6 lbs. of meat and bones. When making beef broth, you always want to roast the bones first. It provides for better flavor and also helps the bones to begin the process of releasing the “good stuff” that will help your broth to gel.
  Don’t trim any fat, but go ahead and sprinkle some sea salt and pepper over the top. Place in a 375 degree oven and roast for about 30 or 40 minutes or until the meat/bones have some nice color to them. These are very meaty bones by the way, sometimes the bones I get don’t have as much meat. You still will want to roast the bones until you see golden brown coloring the edges.


 I was never a fan of macaroni and cheese as a kid. Maybe because the only time we ever had it was with liver and cooked beets (sorry, Mom – I still just don’t get that meal). ??? The cooked beets would always run into the mac and cheese on my plate and well, ewww. And I won’t even start on the liver.


